Thoracentesis: Purpose, Procedure, Risks & Recovery
Complete guide to thoracentesis: Learn about the minimally invasive procedure to drain fluid from your lungs.

What Is Thoracentesis?
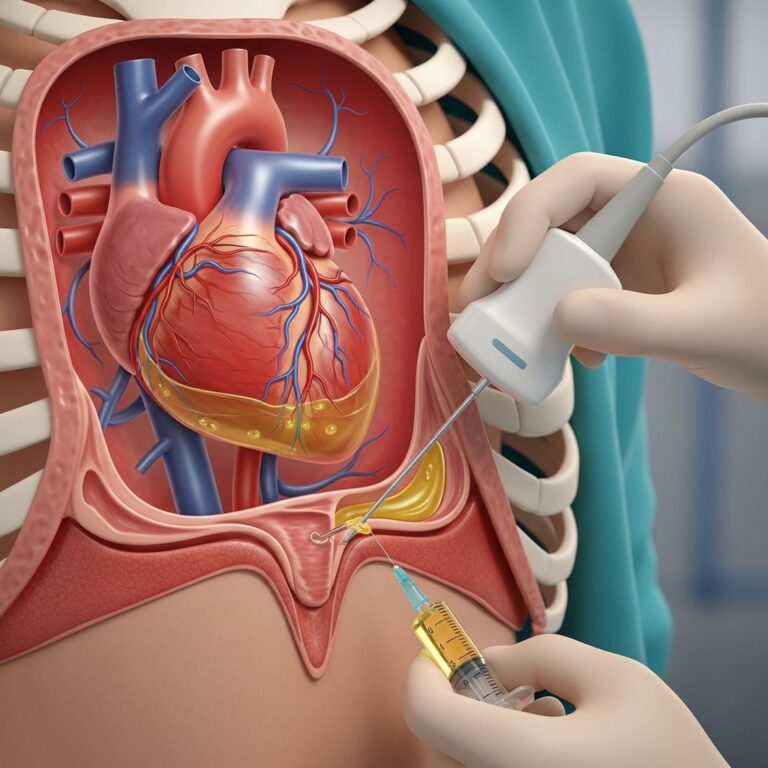
Thoracentesis is a medical procedure that healthcare providers use to drain excess fluid from the pleural space—the area between the lining of the outside of the lungs (pleura) and the wall of the chest. Under normal circumstances, this space contains approximately four teaspoons of fluid, which helps keep the membranes surrounding your lungs from rubbing together as you breathe. However, when certain health conditions develop, fluid can accumulate in this area, creating a condition known as pleural effusion. This buildup puts extra pressure on your lungs and can make breathing difficult.
Thoracentesis is not considered a major surgery. Instead, it is a minimally invasive procedure, meaning your healthcare provider does not need to make large cuts in your tissue. The procedure is typically performed at a hospital and usually takes about 15 minutes to complete. The fluid removal is accomplished using a needle and catheter, often guided by imaging technology such as ultrasound to ensure precision and safety.
Why You Might Need Thoracentesis
Thoracentesis is performed for two primary purposes: to relieve your symptoms and to help diagnose the underlying cause of the fluid accumulation. If you have pleural effusion, your healthcare provider may recommend this procedure to investigate what is causing the excess fluid, allowing them to provide appropriate treatment.
Common reasons to undergo thoracentesis include addressing various underlying conditions that cause pleural effusion. These conditions may involve infections, malignancies, cardiovascular issues, or other systemic diseases. By removing the excess fluid, the procedure helps relieve pressure on your lungs, making it easier to breathe and improving your overall comfort.
Preparation for Thoracentesis
Before your thoracentesis procedure, your healthcare provider will conduct several preparatory steps to ensure your safety and the procedure’s success. Your provider will measure your blood pressure and use a small device on your finger to check your blood oxygen level, establishing baseline vital signs.
Imaging plays a crucial role in preparation. Your provider will use X-ray, ultrasound, or CT scan imaging before the procedure to determine exactly where the fluid is located and how much fluid is present. This imaging guidance is essential for minimizing complications and ensuring the procedure is performed accurately.
On the day of the procedure, you will be asked to change into a hospital gown that opens in the back and to remove any jewelry you may be wearing. It is important to follow all pre-procedure instructions your healthcare provider gives you, including any fasting requirements or medication adjustments.
The Thoracentesis Procedure: Step-by-Step
Patient Positioning
The best position for thoracentesis is sitting upright on a chair or bed with your arms resting on a table in front of you. This sitting position spreads out the space between your ribs, making it easier for your provider to access the pleural space and allowing you to maintain stillness throughout the procedure. If you are unable to sit due to medical reasons, you can lie on your side instead.
Cleaning and Numbing
Once you are positioned correctly, the area where your doctor will perform the procedure is thoroughly cleaned and numbed using a local anesthetic. Your provider will also anesthetize the skin between the two ribs with additional anesthetics that extend down to the pleural space, ensuring that you experience minimal discomfort during needle insertion.
Needle Insertion and Fluid Removal
Your healthcare provider will make a small 2 to 3 millimeter incision in your skin. A larger needle is then introduced into the pleural space, often guided by ultrasound imaging to ensure accurate placement. A catheter (tube) is advanced through the needle, and the needle is then withdrawn. Typically, 1 to 1.5 liters of fluid will be drained into bottles.
During this phase, you may feel some pressure or discomfort, but the local anesthesia should prevent significant pain. Your provider may ask you to hold your breath, be still, or exhale at different times during the fluid removal to optimize the procedure.
Completion and Imaging
Once the appropriate amount of fluid has been drained, your provider will remove the needle and the area will be bandaged. The catheter may remain in place if a chest tube is needed for ongoing drainage. After the procedure, you will typically have a chest X-ray to evaluate the results of the drainage and ensure there is no lung collapse.
Pain and Discomfort During the Procedure
One of the most common concerns patients have about thoracentesis relates to pain. The good news is that thoracentesis should not be painful. When your provider injects the local anesthetic, you might feel a slight sting, similar to a regular injection. As the needle is inserted into your pleural space, you may experience some pressure and discomfort, but the local anesthesia will numb the area, preventing significant pain.
It is important to communicate with your healthcare provider during the procedure. If you experience chest pain, feel short of breath, or feel faint, inform your provider immediately. These symptoms should be addressed promptly, though they are uncommon during this minimally invasive procedure.
Are You Awake During Thoracentesis?
Yes, you will remain awake during thoracentesis. This is an outpatient procedure performed under local anesthesia only, not general anesthesia. Your healthcare provider will use a local anesthetic to numb the area where they will insert the needle, allowing you to remain conscious throughout the procedure. This approach reduces recovery time and allows you to go home the same day.
Risks and Complications of Thoracentesis
Thoracentesis is considered a safe procedure with a low risk for complications. Because it is minimally invasive and providers use imaging to locate the fluid before the procedure, serious complications are uncommon. However, as with any medical procedure, there are potential risks to be aware of.
Complications from thoracentesis are usually not serious and are minimized through proper imaging and technique. Potential risks include:
- Pain and anxiety associated with the procedure
- External bleeding at the needle insertion site
- Pneumothorax (collapsed lung), the most common serious complication
- Hemothorax (blood accumulation in the pleural space)
- Re-expansion pulmonary edema (fluid in the lungs after fluid removal)
- Infection at the procedure site
- Accidental puncture of organs beneath the diaphragm
- Procedure-related death (extremely rare)
Bleeding complications and hemothorax are rare, even in patients with underlying bleeding disorders. In most cases, pneumothorax after thoracentesis is asymptomatic and rarely requires intervention beyond supportive care and close observation. Your healthcare provider can explain the specific risks relevant to your individual situation.
Recovery After Thoracentesis
Recovery time for thoracentesis is short, which is one of the advantages of this minimally invasive procedure. In most cases, you can go home typically within 30 minutes to 1 hour after your vital signs have been confirmed to be stable.
Your healthcare provider may advise you to avoid strenuous activities for 48 hours following the procedure to allow your body to recover properly. You can usually remove the bandage after 24 hours. On very rare occasions, patients may experience a mild cough and discomfort that may last between half an hour to one hour after the procedure.
It is essential that you follow up with your physician as instructed to ensure proper healing and to discuss the results of any fluid analysis performed during the procedure. If you experience unusual symptoms after going home, contact your healthcare provider immediately.
Safety and Minimally Invasive Benefits
Thoracentesis is a safe way to diagnose infections and other illnesses that cause pleural effusion while simultaneously relieving pressure on your lungs and making breathing easier. Because your healthcare provider does not need to make large cuts or damage tissue, there is a low risk of complications compared to more invasive surgical procedures.
The minimally invasive nature of thoracentesis means that recovery is quick, allowing patients to return to their normal activities within a short period. This outpatient procedure can often be performed in a hospital clinic or patient room, and complications can typically be managed effectively when they do occur.
Frequently Asked Questions
Q: How long does a thoracentesis procedure take?
A: A thoracentesis procedure typically takes about 15 minutes to complete, though this can vary depending on the amount of fluid to be drained and individual patient factors.
Q: Will I need a chest tube after thoracentesis?
A: Not always. During a simple thoracentesis, the needle is removed after fluid drainage. However, if ongoing drainage is needed, a chest tube or pigtail catheter may be left in place to drain fluid or air over a few days.
Q: Can thoracentesis be done as an outpatient procedure?
A: Yes, thoracentesis can be performed as an outpatient procedure, meaning you can go home the same day after the procedure, typically within 30 minutes to 1 hour once your vital signs are stable.
Q: What should I do if I experience complications after thoracentesis?
A: If you experience chest pain, significant shortness of breath, or any concerning symptoms after thoracentesis, contact your healthcare provider immediately or seek emergency care.
Q: How soon can I return to normal activities after thoracentesis?
A: You should avoid strenuous activities for 48 hours after the procedure. Most patients can resume their normal activities within this timeframe, though you should follow your healthcare provider’s specific instructions.
Q: Is imaging always used during thoracentesis?
A: Healthcare providers often use ultrasound imaging to guide needle placement during thoracentesis, which helps minimize complications and ensure accurate fluid removal.
When to Contact Your Healthcare Provider
After your thoracentesis procedure, contact your healthcare provider if you experience any of the following:
- Severe chest pain or pressure
- Persistent shortness of breath or difficulty breathing
- Excessive bleeding at the procedure site
- Signs of infection, such as fever or increased redness at the site
- Persistent cough or other concerning symptoms
Conclusion
Thoracentesis is a minimally invasive, safe, and effective procedure for removing excess fluid from the pleural space around your lungs. With proper preparation, skilled healthcare providers, and appropriate post-procedure care, thoracentesis can provide significant relief from symptoms associated with pleural effusion while helping to diagnose underlying conditions. The short recovery time and low complication rate make it an excellent option for patients requiring fluid drainage. If your healthcare provider has recommended thoracentesis, discussing the procedure in detail and understanding what to expect can help you feel more confident and prepared for this important medical intervention.
References
- Thoracentesis — Cleveland Clinic Abu Dhabi. 2024. https://www.clevelandclinicabudhabi.ae/en/health-hub/health-resource/treatments-and-procedures/thoracentesis
- Thoracentesis: Purpose, Procedure, Risks & Recovery — Cleveland Clinic. 2024. https://my.clevelandclinic.org/health/treatments/24254-thoracentesis
- Thoracentesis To Drain Fluid From Lungs: Procedure, Risks — WebMD. 2024. https://www.webmd.com/lung-cancer/thoracentesis-procedure
- Is chest radiography routinely needed after thoracentesis? — Cleveland Clinic Journal of Medicine. 2019. https://www.ccjm.org/content/86/6/371
- Pleural Effusion: Symptoms, Causes & Treatment — Cleveland Clinic. 2024. https://my.clevelandclinic.org/health/diseases/17373-pleural-effusion
Similar Articles


Read full bio of Sneha Tete